


# Week 4 - Making: Modeling: sketch, research, polygon modeling. - Presentation - Hands on studio: team discussion & making. - Assignment: Continuously work on your process report. ___________________ # Basics of low poly modeling ## Game Art Terminology [Link to Safari books online](https://proquestcombo-safaribooksonline-com.ezproxy.torontopubliclibrary.ca/book/animation-and-3d/9780240815824/chapter-1-introduction-to-3ds-max/geometry) ## Low poly practice related images from Pinterest  LOD modeling example from https://www.facebook.com/365610153629761/photos/pcb.434816053375837/434815546709221/?type=3&theater  from Pinterest  from Pinterest  from Pinterest ## Voxel art  Pinterest ## Inspiration - [Jeremy Edelblut DemoReel 2016](https://vimeo.com/161523644) - [Jeremy Edelblut I](http://jeremyedelblut.com/) - [Jeremy Edelblut II](https://www.behance.net/gallery/28605433/Summer-Doodles)  by Jeremy Edelblut (Jeremyedelblut.com) # Examining invalid polygon geometry Some types of polygon geometry will not work in Maya. Invalid geometry includes vertices that are not associated with a polygon edge and polygon edges that are not part of a face (dangling edges). ## Solution - Converting polygon faces to triangles is a quick way to ensure non-planar faces render properly. - Or converting polygon faces to quads is a good way to clean up polygons or reduce the number of faces.  ## Two-manifold vs. non-manifold - Polygonal geometry can have different configurations or topology types in Maya. Understanding the characteristics of these topologies can be helpful when you need to understand why a modeling operation failed to execute as expected. - **Two-manifold topology polygons** have a configuration such that the polygon mesh can be split along its various edges and subsequently unfolded so that the mesh lays flat without overlapping pieces. - **Non-manifold topology polygons** have a configuration that cannot be unfolded into a continuous flat piece. Some tools and actions in Maya cannot work properly with non-manifold geometry. For example, the legacy ***Boolean*** algorithm and the ***Reduce*** feature do not work with non-manifold polygon topology. The image below shows three examples of non-manifold topology polygons.  The following operations in Maya can produce non-manifold geometry: - Select Faces or Edges and select Edit Mesh > **Extrude.** - **Normals > Reverse** (without extracting geometry). - Edit Mesh > **Merge** Components. - **Delete** Face. - Edit Mesh > Merge Components to Center You can convert non-manifold topology polygons into two-manifold topology (including the less obvious case of adjacent faces with opposite normals) using the **Mesh > Cleanup** tool in Maya. # Cleanup polygon models - [Maya help: Cleanup options](https://knowledge.autodesk.com/support/maya/learn-explore/caas/CloudHelp/cloudhelp/2018/ENU/Maya-Modeling/files/GUID-AB60C982-C96E-4947-8CF3-5152406B6A40-htm.html) - [Maya help: Two-manifold and non-manifold polygonal geometry](https://knowledge.autodesk.com/support/maya/learn-explore/caas/CloudHelp/cloudhelp/2018/ENU/Maya-Modeling/files/GUID-8E97CEF7-1CFE-4838-B4B7-59F526E21AB2-htm.html) The Cleanup feature lets you remove unwanted geometry from a polygon mesh (for example, zero area faces or zero length edges). You can also tessellate faces that may be valid within Maya, but not in a game console, such as concave faces, or faces with holes. Because the Cleanup feature has the ability to merge vertices and collapse zero length edges, there may be situations where the Cleanup feature can output non-manifold geometry. This can occur when you set the Cleanup options to perform multiple cleanup operations on a mesh in a cascading way. If this situation is likely, it is recommended you run the Cleanup feature multiple times and turn on the Non-Manifold Geometry option in the Remove Geometry section only on the last iteration. To clean up polygon meshes - Select the polygon mesh you want to clean up. - Select Mesh > Cleanup. ## Modeling toolkit - [Maya help docu](http://help.autodesk.com/view/MAYAUL/2018/ENU/?guid=GUID-D4CD168A-34F2-465B-A39C-DE20B34E5535) 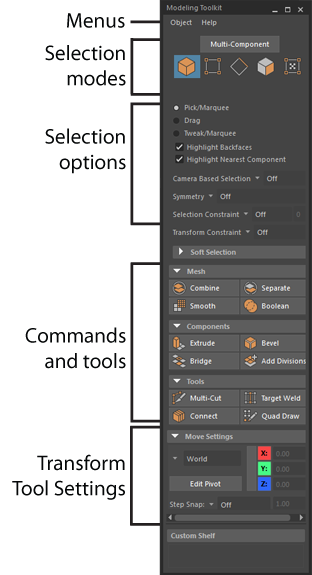 ## Game asset tutorial - [Minions Art is creating Game Art Tips and Astro Kat, a Catventure game! in Patreon](https://www.patreon.com/minionsart) ## Maya based low poly tips  by H.Ji. You can find test models from Windows/General Editors/Content Browser/ - Harden edge - Interpolation of vertex normals to make hard edges: ***Mesh Display/Harden Edge*** - Polygon reduction also known as mesh decimation): ***Mesh/Reduce*** - [Maya help - reduce](http://help.autodesk.com/view/MAYAUL/2018/ENU//index.html?guid=GUID-49F4731D-4F59-4B98-9751-F0E1CAA675CD) - Checking Polygon component numbers - turn on ***Display/Heads Up Display/Poly Count*** - [Maya help - poly count ](http://help.autodesk.com/view/MAYAUL/2018/ENU//index.html?guid=GUID-53E46D0C-4B7B-4404-AEB0-3BDD1FF8608A) - **Poly count:** displays polygon statistics for the visible objects displayed in the view panel, including Vertices, Edges, Faces, Triangles, and UVs. This feature is useful for game development. The first column on the left lists the total components of all the polygons in the scene. The second column lists the total components of the selected polygon(s). The third column lists the total selected components. The default is off. - **PBR** renderer: physically based render in Maya is Arnold. - [Arnold rendering](https://jiharu.github.io/intm3d/week12.html) - aiSkyDomeLight applying when you want to use **HDRI**.  - Above image: using **ambient occlusion** and adding **bevel** edges. __________ # Modeling tutorials ## Tutorial: low poly robot - [Link to Safari books online](http://proquestcombo.safaribooksonline.com.ezproxy.torontopubliclibrary.ca/book/animation-and-3d/9780240816067/chapter-6-modeling-the-robot-in-maya/14_chapter06_xhtml?uicode=torontopl) - Chapter 6: Modeling the Robot in Maya - Modeling the Low Poly Version - Unwrapping the Robot - Baking the Texture Maps - Texturing the Robot ## Lego chracter modeling & texturing         ## What to do: - Preparation - Low polygon modeling - UV texturing - Shading, lighting, and rendering controls - Smoothing the polygon ## Important commands and tips: - Commands: - Extrude - Booleans - Selections - Deformers - Tips: - Spend some time to **analyze and plan** before beginning the modeling processes. - Well prepared blueprints are important to the modeling processes. - Switch often to check its position from the side, front, and perspective view. - Menu / Select tools are useful and efficient. - Naming: in the outline and layer editor, from time to time spend some time to name them properly. It will help a lot to work on more complex modeling tasks. - Using Layer editor and Shading options to control its **transparent/opaque views** and **templete/reference/object** view & selection modes. ------------------------- ## Preparation - Prepare the front and side images of a Lego model. - Importing blueprints to a front camera and a side camera (View / Image Plane).  - You can adjust the image plane position: using the Image Center X, Y, or Z. And check out the attributes of the image plane from its attribute editor.  ------------------------------ ## Low polygon modeling ### Head - Create from a cylinder polygon object and modify its position and scale. (subdiv: 12) - From the front view, go to the component face selection mode and drag - select faces and from the menu Select / Shrink to select only top faces or neck faces and apply Edit Mesh / **Extrude**. Click its local / world switch and move & scale and apply Extrude to make the head-top or neck geometry: ***Be careful not to apply several extrude commands at once. It is easy to do so. Use Undo to make sure that you didn't multi-fully applied the same function.***  ### Body - Start from a box. Move & scale it and use its vertices to make the right shape.  - Use Extrude to make the lower body. ### Middle belt piece  - From the side view, let's start a cylinder to make the lower part of belt. - Create a box for a belt and apply Mesh / **Booleans / Union** to make an unified geometry. ### Leg - Create a cylinder and go to the side view and locate it.  - In the component mode, select faces as the image below and delete them.  - Select the edge and extrude.  - Select the edge and extrude several times to make the faces of the leg as the image below using the front and side view.   - Apply the **Mesh Tools / Append to Polygon** to create the bottom face of the leg. After this, apply the **Mesh / Fill Hole** to create the closed mesh.  - Now create a box to prepare the Boolean operation. Create a box bigger than the leg we created and from the front view, rotate it as the image plane. Select the leg and the shift select the box and apply Mesh / **Booleans / Difference.**  - This time create a cylinder which is a bit larger than the lower belt part and select the leg and the cylinder and apply Mesh / **Booleans / Difference.**  - Now right leg is done. Before duplicating it, let's clean it. Go to Edit and **Delete by Type / History.**  - In order to use the duplicate special, let's **reset Transformation** to make the manipulator locate in the world center.  - Let's duplicate special. Note that scale X value is -1.  - Great! Now we completed the legs. - Plus, we can duplicate legs and make them a bit larger and apply Booleans / Difference to the belt to complete the belt.  ---------------------------------------------------------------- ### Arm - Let's create a sphere and delete its faces to fit the contour of the image plane. - Then, extrude the edge three times (choose one edge and apply **Select / Contiguous Edges** to select the entire edge perimeter) to make a base arm mesh. (when you apply the second extrude, increase its Divisions to 4 to make more lines for its deformation later.)  - Now apply **Deform / Lattice** to shape the arm. You can control the grid complexity using S, T, U divisions and its components are the Lattice Point. Using the lattice points, you can control and shape the main geometry.    - Once shaping the arm is done, apply Mesh / Fill Hole to close it.  - You can use the sculpt tool to add more fine controls.  ### Hand - Preparation: let's start from a Polygon Pipe. Transform it and then in the component mode, delete faces to shape it. You can apply Mesh / Fill Hole to close the mesh. - Once it's done, you can apply lattices not only to an object but also to selected faces to deform. I applied the lattice to inner faces once and to outer faces again.  - When the hand is done, you can extrude the face from the arm to make a wrist. Then apply Booleans / Union to complete.  - Duplication: now delete its history and apply Reset Transformations and apply duplicate it with -1 scale X to complete both arms.   - *Congratulations!* The low polygon modeling is completed. Before starting the UV layout, please delete all histories and work on naming in the outliner and layer editor.  # Hands on studio Team discussion & making # Assignment detail ## An (online) journal Keep working on it. ## Reading Please read ***"Chapter 3. Introduction to Texturing"*** from the book: Omernick, Matthew. Creating the Art of the Game. New Riders, 2004, *Online access (Toronto Public Library)* ## Making Keep working on your modeling pipeline. |

What is non manifold geometry maya
Pos Terkait


Copyright © 2024 ketiadaan Inc.